> For the complete documentation index, see [llms.txt](https://help.checkoutchamp.com/llms.txt). Markdown versions of documentation pages are available by appending `.md` to page URLs; this page is available as [Markdown](https://help.checkoutchamp.com/funnel-builder/creating-and-editing-funnels-pages/funnel-visualizer-and-page-builder/page-builder/building-blocks/product-blocks.md).
# Product Blocks
Inside the Products menu within the Building Blocks you have several options to choose from to add to your pages.\
\
The Checkbox and Radio Button options are also available under the [Forms](broken://pages/MoWZFbWoEEpmI6p9PYOG) menu, but only the Product variation of these elements will allow you to tie a product to the checkbox or radio button.
* [Product Checkbox](#productblocks-productcheckbox)
* [Product Radio Buttons](#productblocks-productradiobuttons)
* [Variant Selection](#productblocks-variantselection)
* [Product Selection](#productblocks-productselection)
* [Product Tile](#productblocks-producttile)
* [Order Bump](#productblocks-orderbump)
***
### Product Checkbox
Dragging this Block onto the page will add three checkboxes to the page. You can remove any extras if you don’t need them, or if you need more you can simply duplicate one of the existing ones using the button highlighted below.
To set a product or product variant to the checkbox, click on the checkbox and open the element’s settings within the Style Manager. You can also set a checkbox to be preselected when the page loads by enabling the Checked option.
***
### Product Radio Buttons
Dragging this Block onto the page will add three radio buttons to the page. You can remove the extra radio buttons if you don’t need them, or if you need more you can simply duplicate one of the existing ones using the button highlighted below.
To set a product or product variant to the checkbox, click on the radio button and open the element’s settings within the Style Manager. You can also set a radio button to be preselected when the page loads by enabling the Checked option.
***
### Variant Selection
There are two premade variant selection blocks that you can drag onto your page where you can allow the customer to choose from multiple variants of a single product.
To apply a product to the element, you will click on the empty space within the element and then open the element’s settings
After you apply the product, the variant options will be available within the dropdown menu. If you don’t have three variants, you can remove any extras by clicking the element and then the Trash Can on the element tool bar.
***
### Product Selection
This is a premade element that allows you to quickly drag a button and image onto the page.
To apply a product to the element, click on the button and then open the element’s settings to choose the product and button action.
***
### Product Tile
Dragging this Block onto the page will add three product tiles with radio buttons to the page. You can remove the extra tiles if you don’t need them, or if you need more you can simply duplicate one of the existing ones using the button highlighted below.
You can adjust the formatting within the [Style Manager](https://konnektive.atlassian.net/wiki/spaces/CC/pages/1859554055/Style+Manager) and swap out the images for your own product images.
To apply products to each option, click on either the radio button or the normal button within each tile and then open the element’s settings to choose the product. You can also set a radio button to be preselected when the page loads by enabling the Checked option.
***
### Order Bump
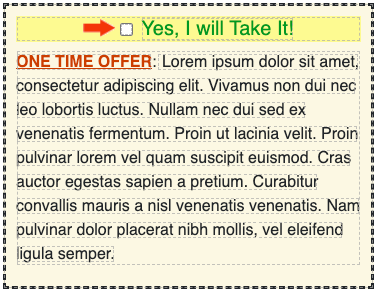
This is a premade element that you can drag to your page to offer extra products for the customer to purchase before submitting their payment on the checkout page.
You can adjust the formatting and the text within the element within the [Style Manager](/funnel-builder/creating-and-editing-funnels-pages/funnel-visualizer-and-page-builder/page-builder/settings-and-styles.md).
To set a product or product variant to the checkbox, click on the checkbox and open the element’s settings within the Style Manager. You can also set a checkbox to be preselected when the page loads by enabling the Checked option.
***